17 November 2009

Additional BIOS settings – USB booting tips and tricks

BIOS setup tips for USB Boot:
The system BIOS can be complicated to someone who is not yet familiar with all of the settings. Here are a few tips to help increase your chances of successfully booting a USB Linux system. If the flash memory stick fails to boot, go back into the system BIOS and try changing some of the following settings (Be sure to take note on any changes you have made). In addition, we have included some other tips to help achieve a successful boot.
  • Switch on or off USB keyboard support
  • Turn off Fast Boot
  • Disable USB 2.0 support (last resort, this will default to USB 1.1)
Other tips to help you Boot from USB:
These are some other suggestions to help ensure a successful USB Linux Boot:
  • Unplug USB hubs and extensions (these may draw from the current needed to wake your USB device)
  • Try using a different USB port. (some frontal ports may not be fully supportive)
  • Unplug additional USB devices. (I've seen something as simple as an IPod halt a system boot)
  • Sometimes a USB drive may go undetected at startup. If your drive has an LED, ensure that it either flashes or remains solid during system post. If the drive does not respond, remove the drive, then power the system completely down for 15 seconds, reinsert the drive and try again.
  • Some laptops using a PCMCIA slot may have troubles booting. You may have to tell Linux to ignore PCMCIA during boot. You can do this in the syslinux.cfg file by simply adding "nopcmcia" to the default boot options or by using a cheatcode before boot.

Restore Your USB Key to it's original state

After having tooled around with a USB Linux version using your image overwritten or multi partitioned flash pen drive, you might find it necessary to revert it back to a single fat partition (restore the flash pen drive to it's original state) that can again be read by all computers. Windows users can follow the Windows instructions below to Restore a Flash Drive using the HP USB Format tool SP27608. For those working from Linux this task can easily be accomplished via the Linux Flash Drive Restoration tutorial that follows.

Restoring your USB key to it's original state via Windows:


  1. Download the HP USB Format tool


  2. Run the USB Format tool. Select your Device from the list, select your File system type, and click Start to format the drive:

  3. hp-usb-fomat-tool


  4. That's it, your USB flash drive should now be formatted in a singular partition just as it was from the factory


Restoring your USB key to it's original state using Linux:


A. First we need to delete the old partitions that remain on the USB key.


  1. Open a terminal and type sudo su

  2. Type fdisk -l and note your USB drive letter.

  3. Type fdisk /dev/sdx (replacing x with your drive letter)


  4. Type d to proceed to delete a partition

  5. Type 1 to select the 1st partition and press enter

  6. Type d to proceed to delete another partition (fdisk should automatically select the second partition)


B. Next we need to create the new partition.


  1. Type n to make a new partition

  2. Type p to make this partition primary and press enter

  3. Type 1 to make this the first partition and then press enter


  4. Press enter to accept the default first cylinder

  5. Press enter again to accept the default last cylinder

  6. Type w to write the new partition information to the USB key


  7. Type umount /dev/sdx (replacing x with your drive letter)


C. The last step is to create the fat filesystem.


  1. Type mkfs.vfat -F 16 /dev/sdx1 (replacing x with your USB key drive letter)


That's it, you should now have a restored USB key with a single fat 16 partition that can be read from any computer.

Boot Multiple ISO from USB (MultiBoot USB)

How to Boot Multiple ISO from USB and create a Multiboot USB. This is a followup of our previous tutorial Boot ISO from USB. Please note that you will need a large USB device to be able to support every bootable ISO in the menu. I will update and add more bootable ISO files to the list as I find the time to test them.

MultiBoot USB Menu (You simply select an ISO to boot from USB)


Grub Menu - Available ISOs to Boot from USB


Basic Essentials to create a Multi ISO Boot USB Flash Drive
  • 4GB+ USB Flash Drive

  • PC that can boot from USB

  • Windows host to create the Bootable USB

  • BootMyISOs.exe

  • Your select ISO Files

This process will currently enable you to do the following:

Boot Ubuntu 9.10 ISO from USB

Boot Xubuntu 9.10 ISO from USB

Boot Kubuntu 9.10 ISO from USB

Boot Parted Magic 4.5 ISO from USB

Boot DSL 4.4.10 initrd ISO from USB

Boot Ultimate Boot 4.11 CD (UBCD) ISO from USB

Boot SliTaz Linux 2.0 ISO from USB

Boot OphCrack XP from USB

Boot OphCrack Vista ISO from USB


How to Boot Multiple ISO Files from USB


  1. Download and run BootMyISOs.exe, a BootMyISOs folder is created on your PC

  2. Run START.bat from the BootMyISOs folder and follow the onscreen instruction


  3. Download the ISO files you want to boot (links provided below) and copy the ISO files to the root of your USB Flash Drive

  4. Restart your PC booting from the USB device

  5. Select the ISO you want to Boot from the Menu and enjoy!


That's all there is to it. You should now be booting your favorite ISO files from your Multi-Boot USB device!


The ISO Download Links


These are the ISO files that correspond to each item listed in the Menu. Simply download the ISO(s) you want to run and copy them to the root of your USB Flash Drive.


Ubuntu 9.10 Torrent (use a Torrent client to get the ISO)

Xubuntu 9.10 Torrent (use a Torrent client to get the ISO)

Kubuntu 9.10 Torrent (use a Torrent client to get the ISO)

Parted Magic Zip/ISO (unzip to obtain the ISO)

DSL 4.4.10 Torrent (use a Torrent client to get the ISO)

Ultimate Boot CD Torrent (use a Torrent client to get the ISO)

SliTaz Linux 2.0 ISO

OphCrack XP 2.31 ISO

OphCrack Vista 2.31 ISO

Recommended USB Linux flash drives

Recommended USB Flash Pen Drives for Portable Linux installation:

  • SanDisk – Cruzer Micro 128M-2G

  • RIDATA – Ritek Mini Spin 128M-2G

  • OCZ – Rally2 (Old Style) 128M-2G

  • OCZ – Mini Kart 128M-1-2G

  • PQI – PQI i810 1-2G

  • PNY – Attache 1-2G

Find complete comprehensive reviews of USB flashdrives that are compatible with Linux at http://pendrivereviews.com


Testing your system for USB boot compatibility

The tutorial will enable a user to check if a computer system can boot from a USB device and ultimately help determine if the computer can boot a Linux version from USB. In most cases if the test is successful, you should have no problem running Linux portably. In addition to testing your pc for USB Linux boot capability, the "Memtest86" system memory diagnostics program that is included, allows the user to scan their system memory for errors by simply booting memtest from a USB device or flash drive.

Basic USB Boot Test Essentials:

  • USB flash device


  • USBTest.zip (includes Memtest, Syslinux and a custom batch file)


Installing Memtest on USB to test for USB Boot compatibility:


The following explains how to install Memtest on a USB device and further run Memtest from USB. Enabling us to test whether a system can boot from USB.


  1. Download the USBTest.zip and extract the contents of the zip to your flash drive. See Screenshot below:

  2. Contents of the extracted zip on drive


  3. Navigate to your flash drive and click makeboot.bat (to make the drive bootable)


  4. Reboot your computer and set your system BIOS to boot from USB-ZIP or USB-HDD. Or, set the hard disk boot priority to boot from the USB stick if your BIOS lists the device as a hard drive

  5. Save your BIOS settings.


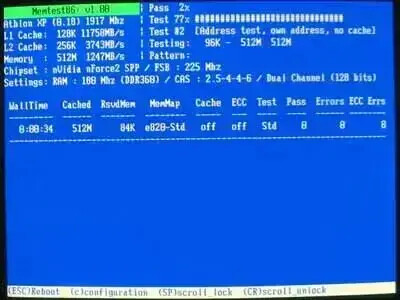
Upon reboot, you should have a successful launch of Memtest from the USB flash drive:


Memtest86 Screenshot:


Memtest Screenshot


This test concludes that your system is capable of booting from a USB device using Syslinux and it should be possible to run Linux from USB.


Notes: After booting Memtest from USB, it is not necessary to complete the system memory test. However, if you have the time, it can't hurt to ensure that your computers memory is in good shape.


This test does not guarantee that your computer hardware is supported with a particular Linux distribution. It is possible to pass this test and still have problems booting Linux. For example: A Video Card driver may not be available by default with a particular Linux distribution which could leave you at the shell after boot.

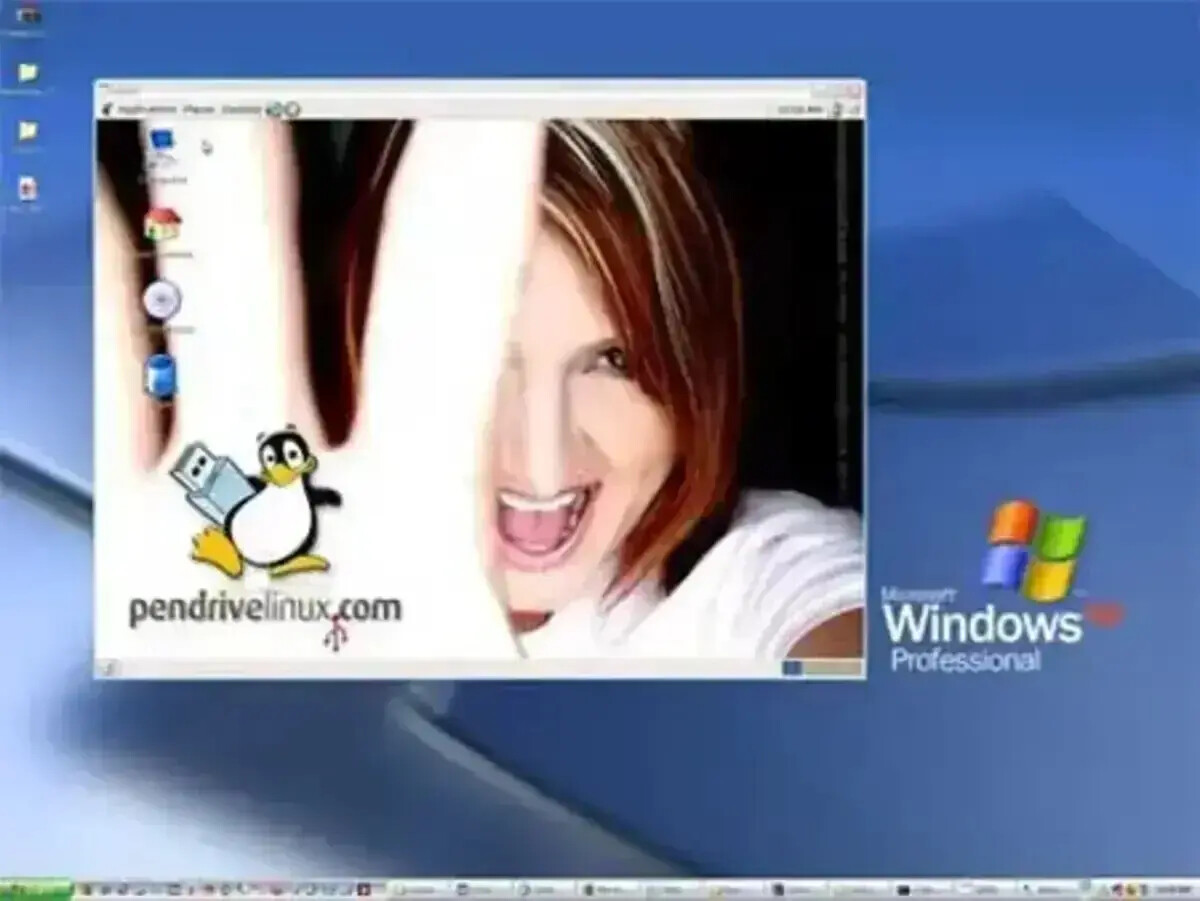
Boot any Linux ISO from USB in Windows

Pendrivelinux running on Windows via Qemu Screenshot:


Portable Pendrivelinux Screenshot


Qemu Home Page: Qemu.org


Requirements:


  • Windows computer

  • USB portable storage device

  • Your favorite Live Linux CD image (ISO)

  • Custom StartLinux.exe including Qemu, Kqemu files


The Process:


  1. Create a directory on your USB device named QStart

  2. Download the self extracting 7-z StartLinux.exe file

  3. Run StartLinux.exe and extract the contained files to the QStart directory on your flash drive


  4. Download your favorite Linux CD (ISO) Image and copy it to the QStart directory on the flash drive

  5. Double click the StartLinux.bat file to boot linux directly from the portable flash device


Note that Qemu boot is slightly slower than booting directly from the USB flash drive or CD at startup. However, it's nice to be able to run Linux from the device even if the computer doesn't support USB boot. This configuration reserves 256MB of system memory for the virtual Linux operating environment. If you wish to increase or decrease this capacity, edit the -m value on the last line of the StartLinux.bat file.


Update 9/24/07: Now Works on Windows Vista hosts

Install Ultimate Boot CD (UBCD) to a Flash Drive in Windows

USB Ultimate Boot CD Screenshot:


USB UBCD


Distribution Home Page: http://www.ultimatebootcd.com


Minimum Flash Drive Capacity: 256MB+


Persistent Feature: No


USB Ultimate Boot CD (UBCD) prerequisites:


  • UBCDfix2.exe (does the USB conversion)

  • UBCD ISO

  • USB flash drive (fat32 formatted)


  • A windows host PC to perform the build


Simple USB Ultimate Boot CD How-To:


  1. Download and launch UBCDfix2.exe, a UBCD folder is created

  2. Download the UBCD ISO and move to your UBCD folder


  3. From the UBCD folder, click fixubcd2.bat and follow the onscreen instructions

  4. Reboot and set your computer to Boot from the USB device

  5. On next launch, you should be booting Ultimate Boot CD from your USB stick


Update 05/19/08: The script now moves the extracted files to the flash drive automatically. It has been tested to work in both XP and Vista.

Install Ubuntu 9.10 to a Flash Drive from Windows

Create a Ubuntu 9.10 Live USB Flash Drive from Windows: In the following tutorial, we show you how we installed Ubuntu 9.10 (Karmic Koala), a product of Canonical Ltd to a USB Flash Drive using a Windows to perform the install. Upon completion, Ubuntu 9.10 can be natively booted and then run directly from your portable device. Note that this installation process does utilize the casper-rw loopback image file for persistently saving and restoring changes on subsequent boots.

Screenshot of Ubuntu 9.10 (Karmic Koala)


Desktop Screenshot of Ubuntu 9.10


Distribution Home Page: ubuntu.com


Minimum Flash Drive Capacity: 2GB


Persistent Feature: Yes


Ubuntu 9.10 Live USB Flash Drive Creation Essentials


  • Windows PC to perform conversion

  • Ubuntu 9.10 ISO


  • 2GB or larger USB flash drive (fat32 formatted)

  • USB-Installer-U910p.exe (contains the files to do the conversion)


Ubuntu 9.10 Live USB Flash Drive Creation tutorial


  1. Download and launch USB Installer-U910.exe, extracting to your PC. A "USB Installer For Ubuntu 910" folder is automatically created


  2. Download this torrent and proceed to download Ubuntu 9.10 ISO using your favorite torrent client.

  3. Place the Ubuntu 9.10 ISO in the USB Installer for Ubuntu 910 folder on your computer

  4. From the USB Installer for Ubuntu 910 folder on your PC, click START.bat and follow the on screen instructions


  5. Once the script has finished, restart your PC and set your BIOS or Boot Menu to boot from the USB device, save your changes and reboot


If all goes well, you should now be booting from your own personal Live Ubuntu 9.10 USB that allows you to save most of your changes persistently.


Persistent size: The default casper-rw loop file that becomes the partition for saving changes is only 1GB.


Update: The script now allows you to create a 1GB to 4GB casper-rw file.


However, If you prefer to resize your casper-rw disk block image file and use more USB storage space for saving changes post install, you can resize casper-rw from Windows or resize casper-rw using Linux

How to Boot an ISO from a USB Flash Drive

  1. Download and run BootMyISO.exe, a BootMyISO folder is created

  2. Run BootMyISO.bat from the BootMyISO folder and follow the onscreen instructions


  3. Restart your PC booting from the USB device and select Memtest86+ from the Menu


If all went well, you should be running the Memtest86+ ISO directly from your USB device.


Boot a Parted Magic ISO from your USB Flash Drive


Using a text editor like notepad++ you can open and edit the menu.lst file found on the root of your USB device. For Example;


  1. Uncomment (remove the # from the Parted Magic Section)

    # title Parted Magic 4.5 ISO Boot

    # find –set-root /pmagic-4.5.iso

    # map /pmagic-4.5.iso (hd32)


    # map –hook

    # root (hd32)

    # chainloader (hd32)


  2. Once you have removed the comments, save the menu.lst file


  3. Download the "pmagic-4.5.iso.zip" and unzip the file

  4. copy pmagic-4.5.iso to your Flash Drive

  5. Restart your PC again and you should now have the menu option Parted Magic ISO Boot


Boot another ISO from your USB Flash Drive


Notice that there is a third section in menu.lst that can be used to test Boot other ISO's from USB.


  1. Simply copy the ISO you want to Boot to your USB device

  2. Uncomment (remove the # from the Test ISO section)

    # title Test ISO

    # find –set-root /testname.iso


    # map /testname.iso (hd32)

    # map –hook

    # root (hd32)

    # chainloader (hd32)


  3. Change testname.iso to the name of the ISO you copied to the USB device

  4. Restart your PC and choose the Test ISO boot option to see if your ISO boots from USB.

Make a Linux Mint 7 Flash Drive using USB Creator

Linux Mint 7 Desktop Screenshot

Linux Mint 7 Desktop Screenshot


Distribution Home Page: LinuxMint.com


Minimum Flash Drive Capacity: 1GB


Persistent Feature: Yes


Essentials for creating a Linux Mint 7 Flash Drive


  • LinuxMint-7 CD

  • Working CD/DVD Drive

  • Working internet connection


  • 1GB USB flash drive (2GB+ recommended)


Make a Linux Mint 7 Flash Drive using USB Creator


  1. Download the LinuxMint-7 torrent and proceed to download the ISO with a torrent client. Finally, burn the ISO to a CD

  2. Restart your computer, booting from the LinuxMint 7 CD

  3. Once your up and running, insert your USB flash drive

  4. Open a Terminal and type or copy and paste the following commands:

    • sudo su


    • apt-get install usb-creator

    • usb-creator


  5. (1) Select the USB disk to use, (2) Select the option Stored in reserved extra space and adjust the slider to set how much space to use for persistence, (3) Click Make Startup Disk: Make a Mint7 USB Disk

  6. A progress bar will appear indicating the percentage completed


  7. Download this custom Linux Mint 7 syslinux.cfg file and copy it to the syslinux directory on your flash drive (overwriting the original)

  8. Remove the CD, restart your computer and set your BIOS to boot from the USB device

Install Linux Mint 7 to a Flash Drive in Windows

Create a USB Linux Mint 7 persistent flash drive using Windows. In the following tutorial, we show you how we used Windows and our custom script to create a Portable Linux Mint 7 USB flash drive. Linux Mint 7 Gloria is based on Ubuntu 9.04 Jaunty Jackalope and is compatible with it's current repositories. Originally launched as a variant of Ubuntu with integrated media codecs, Linux Mint has developed into an elegant Linux distribution. Currently maintained by Clement Lefebvre, more information about Linux Mint can be found at the Official Linux Mint site.


Note: The persistent feature works just as it does in Ubuntu, allowing you to save and restore most of your changes.


Linux Mint 7 Gloria Screenshot:


USB Linux Mint Gloria Screenshot


Distribution Home Page: LinuxMint.com


Minimum Flash Drive Capacity: 2GB


Persistent Feature: Yes


USB Linux Mint 7 Flash Drive creation essentials:


  • 2GB or Larger USB Flash Drive (Fat32 formatted)


  • Linux Mint 7 Gloria ISO


  • fixmint7.exe


Linux Mint Flash Drive creation process:


  1. Download and run USBMint7.exe extracting the contents to your desktop, a USBMint folder is created


  2. Download the LinuxMint-7.iso and copy it to the USBMint folder on your desktop

  3. From the USBMint folder on your desktop, run fixmint.bat and follow the onscreen instructions


  4. Reboot your PC and set your system BIOS or Boot Menu to boot from the USB device, save your changes and reboot booting from the USB memory stick


Upon reboot, you should have a successful launch of USB Linux Mint (Portable Linux Mint 7) from your flash memory stick.


Persistence size: The default casper-rw loop file that becomes the partition for saving changes is only 1GB. If you have room and would prefer to use more space for saving changes you can resize casper-rw from Windows.

Persistent Linux - Data Storage Structure

Persistence – in computer science refers to the characteristic of data that outlives the execution of the program that created it. Without this capability, data only exists in RAM, and will be lost when the memory loses power, such as on computer shutdown."

What does Persistence mean for USB Linux Users?

For USB Linux users, a persistent Linux install is one that allows it's user to save data changes back to the USB storage device instead of leaving the information in system RAM. This data can then be recovered and used again on subsequent boots, even when booting from different machines. Typically a separate Persistent storage space is used in conjunction with a compressed Live Linux OS.

Advantages and disadvantages of using the persistence feature?

Advantages:

1. More available storage space – Since the Live Linux Operating System (OS) is compressed with most persistent installs, the entire operating system takes up less space. Enabling operating systems that usually require gigabytes of space to be condensed into storage capacities less than 1GB in many cases.
2. Less wear on the USB device – Since most of the operating system is loaded into system memory and only the changes are written back to the USB storage device, the read/write cycles decrease, prolonging your USB flash drives life.
3. Independence – The storage space used for persistent changes is independent of and separated from the OS, allowing users to backup or recover persistent changes on the fly without reinstalling and rebuilding an entire operating system. The operating system should still continue to function like a fresh install if the persistence feature is disabled.
4. Portability – Bookmarks, settings, system preferences, customizations and file downloads can in most cases be stored and retrieved when booting from different or multiple machines.

Disadvantages:

1. Limited Protection – Persistent Data is left unencrypted in most cases. Lose your drive, someone could steal and use your data.
2. Persistent data is uncompressed – Although the Live OS can be compressed, the persistent data is left uncompressed making it very easy to run out of storage space quickly.
3. Some changes are not saved persistently – In most cases, further modification is required to enable graphical card settings, network card settings and users to be saved.
Related Posts Plugin for WordPress, Blogger...